A TURNTABLE, especially the tonearm, can look very intimidating to most enthusiasts. The best way to enjoy your turntable is to learn how to set it up properly. There is really no magic to it once you gain an understanding of its mechanics.
You will need the following tools:
1. Small screw driver
2. A pair of small pliers or a sharp nose pincher
3. Stylus gauge
4. Spirit level
5. Overhang tool or alignment protractor
6. Stylus brush
7. Goose neck torchlight (optional)
8. Optical loupe (optional)
9. Strobe disc/light/light bulb (Optional)

There are 12 easy steps to guide you along the process; let’s begin.
STEP 1. It is best to set up in a well-illuminated area and have a small torch handy to light up the darker sections of the turntable.

STEP 2. Ensure that the turntable is level. Use a spirit level to check that it is level on both axes.

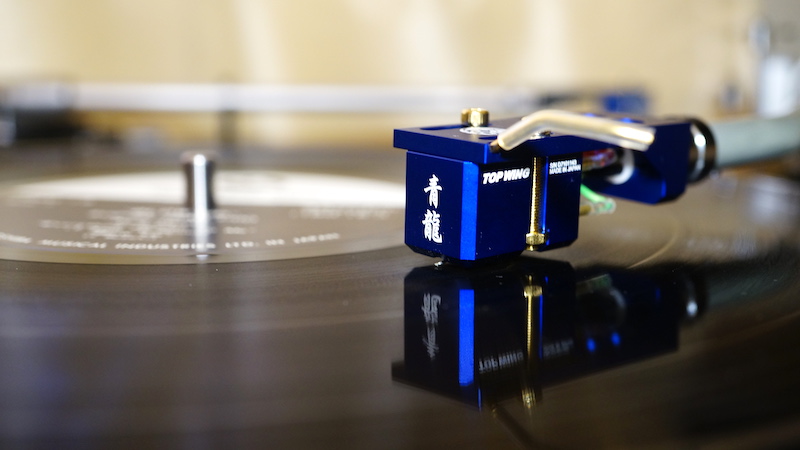
STEP 3. Install the cartridge using either a pincher or small pliers. The headshell leads are colour-coded thus: right channel = red (hot) and green (ground) / left channel = white (hot) / blue (ground).


STEP 4. Check the type of tonearm that you have. There are two popular designs:
a. Static balance tonearm – this relies solely on the rear counterweight for adjusting the tracking force.
b. Dynamic balance – Usually relies on a spring-loaded mechanism where you turn the spring dial to adjust the tracking force.

STEP 5. This is an optional step as most tonearms come mounted. If you have a removable tonearm, it’s good to check its mounting distance to ensure that it conforms to specifications. This is also known as the pivot-to-spindle distance. You can use a ruler tool for this.

STEP 6. Float the tonearm by:
a. Static balance tonearm – turn the rear counterweight until the tonearm is floating level when lowered.
b. Dynamic balance tonearm – set the dynamic balance dial to zero and turn the rear counterweight until the tonearm is floating level when it is lowered.
Return tonearm onto the tonearm holder and lock it in position.
 STEP 7: Set the Vertical Tracking Force (VTF, the force that the stylus tracks at) using a stylus gauge.
a. Static balance tonearm:
– 1. Turn the manual VTF dial to zero when the tonearm is floating level. Note that the VTF dial moves independently from the rear counterweight. It rotates without turning the rear counterweight.
 – 2. Turn the rear counterweight until the VTF dial shows the desired tracking force.

– 3. Unlock and lower the tonearm so that the stylus rests on the stylus gauge to enable you to confirm the VTF on the gauge. If the reading on the gauge is different from your intended setting, adjust the rear counterweight accordingly. Note that you do not need to use a digital gauge; Shure makes a fantastic manual one.

b. Dynamic balance tonearm
– 1. Turn the dynamic VTF dial until it shows the desired tracking force.

– 2. Unlock and lower the tonearm so that the stylus rests on the stylus gauge to enable you to confirm the VTF on the gauge. If the reading on the gauge is different from your intended setting, adjust the VTF dial accordingly.
– 3. It’s good practice to set the VTF at about 80% prior to performing the cartridge or tonearm alignment as it will change. This will prevent excessive pressure on the cantilever suspension. Revisit the VTF once you have completed the alignment phase.
STEP 8. Set the Vertical Tracking Angle (VTA – tonearm height) by observing if the stylus angle is between 90 and 92 degrees against a record surface. Some styli are designed to rest on an angle of 90 degrees while most modern cartridges require 92 degrees to be optimum. Raise or lower the tonearm height until this is achieved. This angle is also popularly known as the Stylus Rake Angle (SRA).

STEP 9: Set the overhang or alignment. Some tonearm designers provide an overhang tool for you to set the correct alignment while others may equip the tonearm package with an alignment protractor.
a. The overhang tool is a simple tool that will enable you to set the alignment fairly quickly. Loosen the cartridge mounting screw slightly so that you can move the stylus tip to align with the overhang tool marking. Tighten the mounting screws upon completion. Remember to check the VTF again upon completing this step.

b. An alignment protractor is a guide sheet that enables you to set the alignment by aligning the stylus tip to one or two fixed points (null points). If you do not have an alignment protractor, you can print one from vinylengine.com or perhaps download the popular custom arc template generator for phono cartridge alignment freeware.

c. Lower the tonearm to check if the stylus tip touches both null points. Loosen the cartridge mounting screws to slide the cartridge until the stylus can touch both the points. If you are using a printed protractor, always have a regular thickness record beneath the paper protractor to maintain the correct alignment when playing.

d. The next step is to ensure that the cartridge has the correct offset angle. You do this by ensuring that the cantilever is parallel against the vertical markings where the null point is. Loosen the cartridge mounting screws to align the cantilever accordingly. Always align using the cantilever and not against markings on the cartridge body.
e. Remember to check the VTF upon completing this step.

STEP 10. Set the anti-skating force by either turning the anti-skating dial or slider depending on your tonearm design. Some enthusiasts set the anti-skating force by lowering the stylus onto a blank record surface and the correct force is when the stylus stays static on the blank record without moving when the record is playing. Others set by ear, gradually increasing the anti-skating force from zero to the point that sounds best to their ears before distortion sets in. I suggest that you try both methods and choose the one that sounds best to your ears.


STEP 11. If your tonearm has a lateral balance setting, you need to set it according to the cartridge weight. Remember to offset the weight difference if you are using a non-standard head-shell for the tonearm.

STEP 12. The last step is to check the turntable speed.
a. You can use a strobe disc to check the turntable speed. One can be printed using the Conrad freeware.
b. The markings for each speed should be stationary when you shine a strobe light on the disc. If you do not have a strobe light, you can use an incandescent lightbulb as it will flicker according to your house voltage frequency.


Once you have completed the 12 steps, clean your stylus with a brush and you are ready to play. Settings rarely run hence you do not have to perform the setup routine regularly. Just remember that practise makes perfect. Have a great time with your turntable.


I strongly disagree with your recommendation of a pair of small pliers or a sharp nose pincher for attaching cartridge clips to the cartridge pins. It is far too easy to crush or damage the clips with such a tool. Use tweezers if you must, although I prefer just using my fingers. I’ve done tons of setups this way. Very frail tonearm leads are a challenge no matter what.
Yes, use as much light as you can get. The more, the better. A multi-LED headlamp, available at home improvement stores such as Lowes, can be a good idea.