
WHILE the pandemic and general economic downturn has been hard on many, I landed the opportunity to be the custodian for a turntable that was in dire need of a restoration.
Earlier in the year, the editor approached me to unload a few pieces of old audio gear. The original owner bought the equipment new in the late 1970s but later migrated, so it has been in storage since… for about three decades!
What I took delivery of was a dead Technics SL-150 direct-drive turntable, factory fitted with an SME 3009 Series II Improved tonearm and a Shure V15 Type-III cartridge. There was also a Garrard MRM-101 Music Recovery Module – an MM phono stage with a noise suppression feature – that needed nothing more than a little servicing with its parts.

The turntable surface was very dirty, with dust caked into every crevice I could see. From visual inspection, though, everything looked to be in good condition – dirty, but nothing broken, except for the missing cartridge cantilever. The arm was even graciously fitted with an SME FD200 fluid damper, but there was only one paddle (13mm, white) and the damping fluid was dirty.


The arm also came with an ADC LMG-1 headshell instead of the original shield-shaped SME headshell. The weight between the two is fairly close, at roughly 7g. The difference is that the ADC headshell allows adjustment, the SME headshell doesn’t. Still, it would have been nice to have a complete set.


The headshell wires were disintegrating, even with careful prying using flat-blade screwdrivers and needle-nose pliers. The cartridge was also stuck to the headshell with some sort of glue or epoxy. I spent some time carefully scraping off the glue from the headshell and cartridge body. There was discolouration on the cart from the glue, but I brought it back to shine with some solvent.


Flipping over the deck carefully, there were clear marks from where the cables touched the plastic bottom cover. This, I suspect, happened due to some chemicals migrating from the cable into the hard plastic, causing it to melt and become malleable. The marks were also evident on the hole from where the phono cables exit.


This cable issue needed to be addressed, I won’t let it cause prolonged damage to itself.

The feet were absolutely trashed – luckily, they were standard M3 mounts so replacements were readily available.
The electronics were intact. The SME four-pin connector was secured with a cloth tape to the screening can because they did have a reputation for getting loose over time. The cloth tape was just SME’s way of saying “noted”. Having no strain relief was also a weird decision.


THE RESTORATION
The power/speed switch was unresponsive, the unit would not turn on. Not that I minded, because the SL-150 is a beautiful monolithic piece of equipment, almost as beautiful as a piece of sculpture set on the console table to be the main conversation piece in the living room. But that isn’t what it was built for, so I intended to make it run again.
Dissecting to find the cause of the dead turntable, I went straight to the most common cause for it, which was a blown fuse. Sure enough, the 1A fuse on the secondary winding was gone. The 315mA fuse on the mains was still good.
A blown 1A fuse is common in old turntables like this one because of a dead mains snubber capacitor. Replacing it with a modern X2-rated capacitor should ensure a long and steady life.


The turntable now started to spin again and the strobe lit up. “Well, that was easy,,” I thought, “Almost, too easy…”
I was testing the speed when the filter capacitor promptly blew out the magic smoke. This is what we call in the industry a “bad day”’ After quite the show, I went ahead and desoldered all the old and tired electrolytics and ordered new ones from Element14. While I was there, I also cleaned up the board from old flux.

Later, I cleaned up the speed adjustment pots and the speed selector/power switch as well. A little squirt of contact cleaner into the speed adjustment pots while rotating them back and forth did the trick.

The power switch needed a little bit extra care; being exposed to the environment, it has a tendency to accumulate dust and grime. If you have an old Technics with a rotary power switch that won’t keep steady speed, chances are this would fix it.
Disassemble the switch and clean the contacts as well as the miniature contactor with a cotton bud and some cleaner or solvent. For this, I used some pure isopropyl alcohol (IPA). Look at how much gunk I picked up from a very small area.


Once replacement parts arrived, I proceeded to complete the full recap for the main board. A little sticker with the date will help future custodians should they ever open the turntable up for servicing down the line.


Once everything was back up to spec mechanically and electrically, I oiled the bearing and checked the speed again. Now it was rock steady.
I turned my attention to the tonearm, which was still in good shape. Old rubber parts like the grommets and spider wayrod assembly were rotten so replacements were ordered. In the meantime, it needed to be cleaned and brought back up to its former glory.


The knife edge bearing was still in great shape despite its age and the lateral bearing also spun freely with no play. The tonearm wires upon inspection were still intact compared to the headshell wires. After cleaning and inspection, the arm was reassembled.


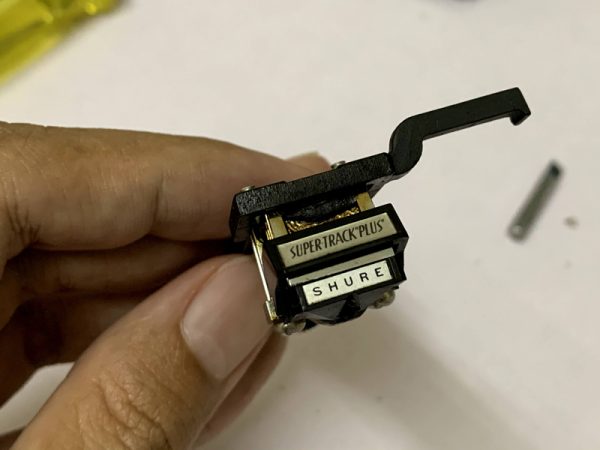
The cartridge looked a lot better after cleaning and polishing from all that black brittle glue. I took a gamble and decided to reuse it.
I ordered a replacement stylus for the Shure V15 Type III cartridge from JICO. The new stylus was a hyper elliptical VN-35HE. I also grafted on the SHURE labelling from the old stylus onto the JICO to maintain the look. It’s a small detail but nice.


Another small detail – a new bias counterweight thread, the older one being discoloured and kinked.


I taped the rectangular hole for the phono out (instead of using the circular one) with aluminium tape to protect the plastic from damage by the cable again. There was also no strain relief aside from the cloth tape holding the connector together so I attached one to an existing screw mount with a self-tapping screw. The strain relief also allows the tonearm connector to be connected without the cloth tape. The turntable has survived for 40 years, there’s no reason for it not to survive another 40.


Next came polishing the cover, changing the power plug, and putting in the new feet.


The last piece in the tonearm restoration was the SME FD200 tonearm damping system. The trough, lid, and white paddle were thoroughly cleaned using IPA.
Originally this damping system came with three paddles to suit your cartridge compliance – 13mm white paddle for compliances below 20cu, 9mm grey paddle for above 20cu, and 7mm black for above 30cu.

Assuming the JICO stylus retained the original specification, our Shure V15 III has a rated compliance of 30 x 10 (-6) cm/dyne of force, or 30cu. Since the paddle is larger than what we need for the Shure, I measured and cut it down to 7mm. Full set replacements are readily available, though at steep prices, so I was not too worried about cutting the paddle.
The original damping fluid calls for a 200,000cSt silicone oil. I didn’t have a 200k one but some 300k was left over from a previous tonearm restoration, so I used that.

Filling up the trough took just a little bit more than 1ml from my syringe. The damping oil was then left to sit for a while for it to settle.
The arm and cartridge were then aligned and calibrated. A neat trick I picked up through the years is to tape a mechanical pencil lead to the cartridge to help amplify any offsets.

While the indexing on the wayrod is useful to set the tracking force (VTF), a much better and accurate way is to use a tracking force gauge. I went through a range of VTFs to find what sounded best and settled with 1.25g.

The damping was initially too much since the fluid viscosity is higher than the original spec. I used a pinhead to scoop out the fluid bit by bit. The process was lengthy and time-consuming as the fluid itself required some time to settle between listening tests.
But once I reached the sweet spot, the arm performed phenomenally. Along with the table came a curious little clamp by Michell Precision Engineering Ltd. For those unaware, this was the first ever turntable clamp in history and was designed by J. A. Michell himself. He tried to patent the idea but the patent office declared that the design was not significant enough to warrant its attention

Suffice to say the clamp worked like a charm, leaving my records flatter than when they came out of the sleeves. It is, however, a little larger than some lead out grooves so the cartridge will rub against it if left unattended. Newer clamps either have a smaller diameter or a tapered profile to avoid that.
TO INFINITY, AND BEYOND (?)
So while the debate on whether digital or analogue objectively sounds better might continue even beyond my lifetime, it is a lot more romantic to believe that machines like this Technics will continue to exist well into the future. It will serve as a conduit to show how our ancestors implemented creative ways around technological limitations to reproduce pre-recorded audio accurately.
Judging by the build quality too, it will be in service far longer than the throwaway digital devices we have today, what with the planned obsolescence and all that.
To quote from Dead Poets Society, “And medicine, law, business, engineering, these are noble pursuits and necessary to sustain life. But poetry, beauty, romance, love, these are what we stay alive for.”


What a beautiful restoration.
Gorgeous deck and your diligence and work sure look like they paid off.
Bravo
Hermosa restauracion y excelente equipo technics.y lo bueni es que se le consiguen todas las piezas.para su restauracion.felicitaciones.
Thank you very much. The process was worth it.
Nice work, old chap. Good to see these vintage units, which can hold their own against much of today’s fare, get a new lease of life.
Always happy to revive workhorses like this.
I like the pencil lead trick, gonna try that on the next alignment.
It’s just one of those things that make you go “Why didn’t I think of that?” because it made so much sense.
Good work! I restored a SL 1700 totally and installed a Shure V15 mkiv with the Jico v45HE ? For it? and played with alternating a m97xe with Jico, the iv wins by a hair. Then brought home a $700 Grado and it was clearly not as nice as the iv for me. Good thing it was a trial.
I think this technics line of turntables is remarkable . Nice article, good writing.
The V15 sure has their own charm.
Very cool to see this! I have an SL 1700 that appears to be a very close cousin to your example. I have tinkered with a bit but nothing like your work here. That said, it’s a real workhorse and very reliable over the 10 or so years in my service. I have two more Technics turntables currently in use so I do love the brand! Happy Holidays
They will run for decades when taken care of. Seems like you got the Technics bug!
Nice work! I enjoyed your article very much. I’m a Technics fan as well – found a good SL-J2 on eBay and only had to do a little external cleanup. I’m an engineer, so all the little details you show are interesting to me. Thanks.
You could probably understand the internals better than me if you snoop around under the hood. The SL-J2 is interesting too. Never touched one yet, the whole linear tracking thing might require a better man than me if something goes wrong. Cheers!
Fabulous photo essay, with lots of helpful info. – thanks so much! I too have an SL150, although luckily for me it arrived with me in great condition. If it ever goes wrong I have bookmarked this page to come back to.
Hi. I have the same deck. I have a ground issue with the tone arm. Could you please send me pics of where the ground wire attaches inside the deck . Many thanks and fantastic restoration.
Hi Matthew thank you for your question. I can’t find the photos anymore, but from what I see in the images the ground wire is attached to one of the screws securing the metal sheet that shields the tonearm wire. You can trace the single thin wire in the image and it disappears somewhere within the tonearm mount.
If it still has a ground issue try using a lockwasher for better electrical contact.
That looks really great. I too have an old SL-150 with SME 3009 S2 (Fixed) that I will revive in a similar fashion. where did you get the feet from see replacements available for the SL-1200, but I am not sure whther very much is actually interchangeable between the 120x and 150x turntable models.
These feet were not direct replacements, they’re generic aluminium feet for turntables and amplifiers. I’ve seen them on eBay and they are quite cheap.
Could you please tell me the details of the X2 snubber capacitor?
I’m repairing the same turntable but unable to read the details.
From what I remember, I followed the service manual for the value. It is written as 0.047uF.
Lovely restoration. I did similar a few years back. My SL-150 has a beautiful Mayware Formula 4 unipivot arm. It’s a super combination.